Setting up Your Email in Microsoft Outlook 2013 or Office 365
These instructions apply to any
Telnet Email Domains
Telnet Email Domains
These settings work if your email domain is any of the following:
| 995.ca | idirect.com |
| bconnex.net | idmail.com |
| connect.ab.ca | interlinks.net |
| direct.ca | internet.look.ca |
| dsuper.net | lindsaynet.com |
| durham.net | look.ca |
| idirect.ca | telnetmail.ca |
| Server Settings | Server/Host Name | Port |
SSL
SSLSSL (Secure Socket Layer) is a protocol that encrypts information on the internet for security reasons. Using SSL when you set up your email account will encrypt data sent between your mail client and the Telnet mail server to protect your messages and account information. |
|---|---|---|---|
| Incoming Mail Server (IMAP) | mail.telnetmail.ca | 993 (Preferred) | Yes |
| 143 | No | ||
| Incoming Mail Server (POP) | mail.telnetmail.ca | 995 (Preferred) | Yes |
| 110 | No | ||
| Outgoing Mail Server (SMTP) | mail.telnetmail.ca | 465 (Preferred) | Yes |
| 25 or 587 | No |
- Open Microsoft Outlook 2013.
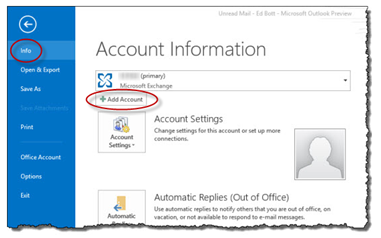
- Select File from the top left corner.
-
Select Info and then Add Account.
-
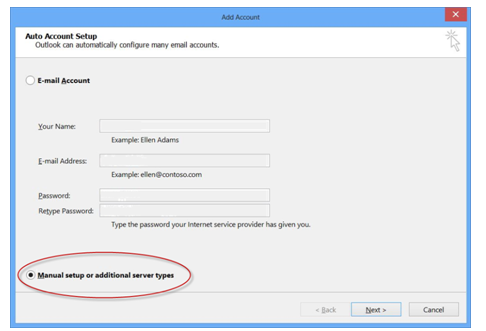
Select Manual setup or additional server types and click Next.
-
Select POP or IMAP on the Choose Service screen.

- Click Next.
-
In the Configure Server Setting screen enter the following:
Choose IMAP If…- you want to access your email from multiple devices
- your local storage space is limited
- you are worried about backing up
Choose POP If…- you want to access your mail only from your computer
- you need constant access to your email, regardless of internet availability
- your server storage space is limited
If you aren’t sure which to use choose IMAP.
Incoming mail server: mail.telnetmail.ca
Outgoing mail server (SMTP): mail.telnetmail.ca
User Name: Your telnetmail.ca email address
Password: Your telnetmail.ca email password

- Click More Settings…
-
On the Internet E-mail Settings screen select My outgoing server (SMTP) requires authentication and click OK.

- Click Next on the Internet E-mail Settings screen.
-
Click Finish.
You should now be able to send and receive email. - If you still can’t send or receive email, call 1-855-835-6381.